
S’mores are more than just a delicious treat; they are a cherished symbol of summer nights spent around campfires, laughter echoing in the air, and the warmth of friendship. The combination of gooey marshmallows, rich chocolate, and crunchy graham crackers creates a nostalgic experience that many of us hold dear. However, making traditional s’mores often requires a campfire or an oven, which may not always be convenient. Enter the Crispy Delight No-Bake S’mores Bars – an easy and delightful twist on the classic treat that brings all the flavors of s’mores without the fuss of baking.
No-bake recipes have surged in popularity, especially among busy home cooks looking for quick and accessible dessert options. These recipes are incredibly versatile, allowing for creative spins on traditional dishes while saving time and effort. The Crispy Delight No-Bake S’mores Bars encapsulate this convenience, providing a fun and easy dessert option that anyone can whip up in no time. Whether you’re hosting a summer barbecue, planning a family movie night, or simply craving something sweet, these bars are sure to impress.
In this article, we will dive deep into the world of no-bake desserts, exploring their benefits and versatility. We will also break down the essential ingredients needed for our Crispy Delight No-Bake S’mores Bars, so you can understand the role each component plays in crafting this delightful treat. Finally, we’ll provide you with detailed step-by-step instructions to ensure your bars turn out perfectly every time. Let’s get started on this sweet adventure!
Understanding No-Bake Desserts
No-bake desserts are exactly what they sound like: delicious treats that require no baking. These recipes typically rely on refrigeration or chilling to set and achieve the desired texture. The benefits of no-bake desserts are numerous and appealing, especially for those who may feel intimidated by baking or simply lack the time to spend in the kitchen.
First and foremost, no-bake desserts save time. With many recipes taking just a few minutes to prepare, they are perfect for spontaneous gatherings or last-minute cravings. Moreover, they often require fewer dishes, which means less cleanup – a major plus for busy home cooks.
The versatility of no-bake recipes is another reason for their popularity. From cheesecakes to energy bites, no-bake desserts can be adapted to suit various tastes and dietary restrictions. You can easily swap ingredients, adjust sweetness, or incorporate different flavor profiles to create a dessert that is uniquely yours. This flexibility allows home bakers to get creative without the constraints of traditional baking methods.
In addition to being a time-saver, no-bake desserts can also provide delicious results without the need for specialized equipment. Many no-bake recipes can be made using common kitchen tools like mixing bowls, spatulas, and a refrigerator, making them accessible to novice cooks and seasoned bakers alike.
With these advantages in mind, it’s no wonder that no-bake desserts have become a staple in many households. The Crispy Delight No-Bake S’mores Bars take this concept to the next level by combining the beloved flavors of s’mores into an easy-to-make treat that everyone will enjoy.
Ingredients Breakdown
To create the Crispy Delight No-Bake S’mores Bars, you’ll need a handful of simple yet essential ingredients. Each component contributes to the overall flavor and texture, ensuring that the final product is a satisfying homage to the classic s’mores experience. Let’s break down each ingredient:
Graham Cracker Crumbs
At the heart of every s’more is the graham cracker, which provides that essential crunch and slight sweetness. In our no-bake bars, graham cracker crumbs serve as the base, giving structure to the dessert while mimicking the traditional s’mores experience. When selecting graham crackers, opt for those made with whole grains for added flavor and nutrition. The crushed texture also allows for easy mixing and binding with the other ingredients.
Mini Marshmallows
Mini marshmallows are a key player in achieving the classic s’mores taste. Their fluffy, chewy texture and sweet flavor create that familiar gooeyness that s’mores lovers crave. In our bars, mini marshmallows will be mixed throughout, providing pockets of sweetness that contrast beautifully with the chocolate and graham cracker crumbs. For an extra touch, consider using colored or flavored marshmallows to add a unique twist to your bars.
Milk Chocolate Chips
The choice of chocolate is crucial when it comes to making s’mores bars. Milk chocolate chips are the traditional choice, offering a creamy, sweet flavor that pairs perfectly with the graham crackers and marshmallows. For those who prefer a richer taste, semi-sweet or dark chocolate chips can be used instead, creating a more sophisticated flavor profile. Whichever option you choose, ensure the chocolate is of high quality, as it will significantly impact the overall taste of the bars.
Unsweetened Cocoa Powder
In addition to chocolate chips, unsweetened cocoa powder enhances the chocolate flavor and adds depth to the bars. It contributes a slight bitterness, balancing the sweetness of the marshmallows and chocolate chips. Look for high-quality cocoa powder for the best flavor, and consider sifting it before adding it to the mix to avoid clumping.
Unsalted Butter
Butter is essential for binding the ingredients together and adding richness to the bars. Using unsalted butter allows you to control the overall saltiness of the dessert, ensuring a perfectly balanced flavor. When melted, the butter combines with the graham cracker crumbs and cocoa powder, creating a cohesive mixture that holds the bars together once chilled.
Powdered Sugar
Powdered sugar serves two main purposes in our Crispy Delight No-Bake S’mores Bars. First, it adds sweetness, enhancing the overall flavor of the dessert. Second, it contributes to the texture, helping to create a smoother mixture when combined with the melted butter. Be sure to sift the powdered sugar to eliminate any lumps before incorporating it into the mix.
Vanilla Extract
A splash of vanilla extract elevates the flavor profile of the bars, adding a warm, aromatic note that complements the chocolate and marshmallows. When selecting vanilla extract, opt for pure vanilla for the best taste. Imitation vanilla can be used in a pinch, but it lacks the depth of flavor that pure extract provides.
Additional Toppings
To take your Crispy Delight No-Bake S’mores Bars to the next level, consider adding extra toppings. A sprinkle of additional mini marshmallows on top provides a delightful visual and textural contrast, while a drizzle of melted chocolate adds an elegant finishing touch. You could also incorporate crushed graham crackers or even a dusting of cocoa powder for an extra layer of flavor.
Step-by-Step Instructions
Now that we’ve covered the essential ingredients, it’s time to get started on creating your Crispy Delight No-Bake S’mores Bars! Before you begin, it’s crucial to prepare your workspace for a smooth cooking experience.
Preparing the Pan
Start by preparing a square or rectangular baking pan (an 8×8 or 9×9-inch pan works well). Line the bottom and sides of the pan with parchment paper, allowing some overhang on the edges. This step is important, as it will make it easy to lift the bars out once they are set. If you don’t have parchment paper, you can also use aluminum foil, but be sure to lightly grease it to prevent sticking.
With the pan ready, you can gather your ingredients and tools, ensuring everything is within reach for a seamless preparation process. This organized approach will help to streamline the assembly of your no-bake s’mores bars, giving you the confidence to create a delicious dessert that pays homage to the classic campfire treat.
Stay tuned for the next part, where we will guide you through the detailed steps for mixing, assembling, and chilling your Crispy Delight No-Bake S’mores Bars.
Making the Base
To create the perfect foundation for your Crispy Delight No-Bake S’mores Bars, achieving the right consistency is paramount. Start by finely crushing your graham crackers into crumbs using a food processor or by placing them in a sealed plastic bag and rolling over them with a rolling pin. The finer the crumbs, the better they will bind with the melted butter and marshmallows.
Next, combine the graham cracker crumbs with melted butter in a mixing bowl. The key here is to ensure that the butter evenly coats the crumbs. Use a spatula or your hands to mix until the mixture resembles wet sand. It should hold together when squeezed in your palm, but not be overly greasy. If it feels too dry, you can add a bit more melted butter, a tablespoon at a time, until you reach the desired consistency.
Incorporating Marshmallows and Chocolate
Incorporating marshmallows and chocolate into your base is crucial for achieving that delightful s’mores flavor. After preparing your graham cracker mixture, fold in mini marshmallows and chocolate chips. For an even distribution, it helps to slightly warm the marshmallows in the microwave for just 10-15 seconds. This will make them more pliable and easier to mix without breaking apart.
When adding chocolate chips, consider using a mix of semi-sweet and milk chocolate for a balanced flavor profile. This combination not only enhances the sweetness of the bars but also complements the creaminess of the marshmallows. Gently fold all the ingredients together until they are uniformly mixed, ensuring that each bite will be packed with the classic s’mores experience.
Pressing into the Pan
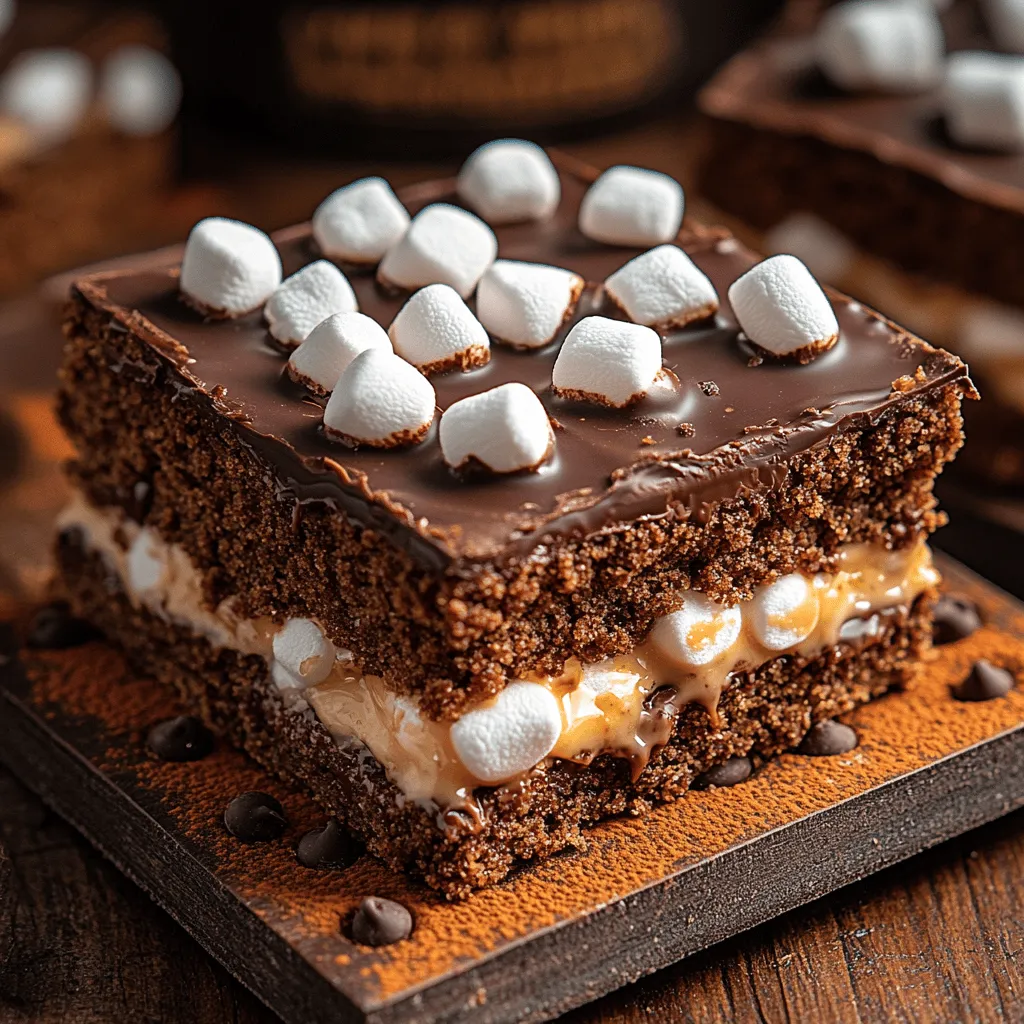
Once your mixture is ready, it’s time to press it into the pan. Use a parchment-lined 9×9 inch baking dish for easy removal later. Transfer the mixture into the pan and, using the back of a measuring cup or your hands, press it firmly and evenly into the bottom. It’s crucial to apply even pressure to prevent the bars from crumbling later. Aim for about ½ inch thickness, making sure there are no gaps or uneven areas.
If you notice any sticking, lightly grease the measuring cup or your hands with cooking spray to make the process smoother. This well-pressed base will support the marshmallow topping and maintain structure when sliced.
Chilling the Mixture
Chilling the mixture is essential for achieving the right texture for your no-bake s’mores bars. Once you have pressed the mixture into the pan, place it in the refrigerator for at least 30 minutes. This chilling time allows the butter to firm up, creating a solid base that holds its shape when cut.
The cooling process also helps meld the flavors together, enhancing the overall taste of the bars. If you are in a hurry, you can pop them in the freezer for about 15 minutes, but be careful not to freeze them solid, as you want a soft, chewy texture.
Preparing the Topping
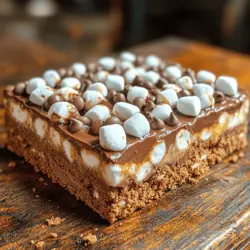
The topping is where the magic happens in these bars. For the perfect layer, you will need more mini marshmallows and chocolate. Spread a generous layer of marshmallows over the chilled base. You can either leave them whole or cut them in half for a more even distribution.
For the chocolate layer, melt chocolate chips in a microwave-safe bowl, stirring every 30 seconds until smooth. Pour the melted chocolate over the marshmallows, ensuring they are completely coated. This not only adds richness but also creates a glossy finish. For a gourmet touch, consider sprinkling a few crushed graham cracker crumbs on top before chilling again.
Final Chill and Serving
After assembling the topping, return the pan to the refrigerator and allow it to chill for another 30-60 minutes. This final chilling step is crucial for setting the bars and allowing the chocolate to harden. Once sufficiently chilled, lift the bars from the pan using the edges of the parchment paper. Place them on a cutting board and slice them into squares or rectangles with a sharp knife.
For best results, cut with a hot knife (run it under hot water and dry it off) to achieve clean, smooth edges. Serve immediately, or store them appropriately if you’re saving them for later.
The Science Behind S’mores Bars
Understanding the science behind your ingredients can deepen your appreciation for these delicious bars. The classic combination of graham crackers, marshmallows, and chocolate not only creates a delightful taste experience but also a textural balance. The crunchiness of the graham crackers contrasts beautifully with the gooeyness of marshmallows and the rich, melty chocolate.
Refrigeration plays a key role in setting no-bake desserts. It helps solidify the fats in the butter and chocolate, which is essential for maintaining structure. As the bars chill, the flavors meld together, creating a harmonious blend that makes the s’mores flavor truly shine.
Serving Suggestions
To elevate your presentation and flavor, consider a few serving suggestions for your Crispy Delight No-Bake S’mores Bars:
– Garnishing: Top each bar with a drizzle of melted chocolate or a sprinkle of mini marshmallows for a decorative touch. You can also use crushed graham crackers to create a rustic finish.
– Pairing: These bars pair wonderfully with a scoop of vanilla ice cream or whipped cream. The creamy texture complements the chewiness of the bars perfectly, making for an indulgent treat.
– Flavor Variations: Don’t hesitate to customize your bars. Consider adding chopped nuts like almonds or pecans for an added crunch. You can also experiment with different types of chocolate, such as dark chocolate or white chocolate, to create a unique flavor profile.
Storage and Shelf Life
Proper storage is essential to maintain the freshness of your Crispy Delight No-Bake S’mores Bars. Store them in an airtight container in the refrigerator. This will keep them firm and prevent them from absorbing any odors from the fridge.
These bars can typically last for up to a week in the refrigerator. If you want to extend their shelf life, you can freeze them. To freeze, cut the bars into portions, wrap each piece in plastic wrap, and place them in a freezer-safe container. When you’re ready to enjoy, simply remove them from the freezer and let them thaw in the refrigerator for a few hours.
Conclusion
Crispy Delight No-Bake S’mores Bars are not only a treat for the taste buds but also an easy and fun dessert to make. Their combination of crunchy graham crackers, gooey marshmallows, and rich chocolate creates a nostalgic flavor that transports you to summer campfires, regardless of the season.
We encourage you to try this recipe, bringing a piece of comfort and joy into your home. Homemade desserts like these not only satisfy cravings but also create cherished memories with family and friends. Whether shared at a gathering or enjoyed quietly at home, these bars are sure to become a favorite in your dessert rotation. Embrace the joy of cooking and the warmth of homemade treats with these delightful no-bake s’mores bars.