
In recent years, no-bake desserts have surged in popularity among home cooks and dessert enthusiasts alike. Their convenience, coupled with the ability to create delicious treats without the need for an oven, makes them an appealing option for busy lifestyles. Among the plethora of no-bake recipes, Peanut Butter Crunch Bliss Bars stand out as a delightful choice that beautifully balances health and indulgence. These bars offer a rich, satisfying flavor profile while incorporating nutritious ingredients, making them a favorite for both children and adults.
Peanut Butter Crunch Bliss Bars are not just a sweet snack; they are crafted to provide a wholesome energy boost, thanks to their key ingredients. Creamy peanut butter serves as a primary component, packed with protein and healthy fats, while rolled oats add fiber and heart-healthy benefits. Together, these ingredients form a deliciously satisfying treat that is perfect for snacking, dessert, or even a post-workout boost.
Understanding the Ingredients
To truly appreciate Peanut Butter Crunch Bliss Bars, it’s essential to delve into the individual components that make this recipe both nutritious and delicious. Each ingredient plays a crucial role, contributing not only to the flavor and texture but also to the overall health benefits of the bars.
Creamy Peanut Butter
Peanut butter is the star of this recipe, providing a rich, nutty flavor while being a powerhouse of nutrition. It’s an excellent source of protein, which is essential for muscle repair and growth, making it a popular choice for athletes and active individuals. Additionally, peanut butter contains healthy fats, which are important for heart health and provide a satiating quality to the bars. When selecting peanut butter, you can choose from various types, such as natural, creamy, or crunchy, depending on your texture preference. Opt for unsweetened varieties to keep the bars healthier and let the natural sugars from other ingredients shine through.
Honey or Maple Syrup
As natural sweeteners, honey and maple syrup not only add sweetness but also come with their own health benefits. Honey is renowned for its antioxidant properties and potential antibacterial effects, making it a superior alternative to refined sugars. Maple syrup, on the other hand, is rich in minerals like manganese and zinc, and it has a lower glycemic index than regular sugar, which can help manage blood sugar levels. Both sweeteners blend seamlessly into the mixture, enhancing the bars’ flavor while keeping them natural and wholesome.
Vanilla Extract
Vanilla extract is a staple in baking and dessert making, known for its ability to enhance flavors. In Peanut Butter Crunch Bliss Bars, a splash of vanilla extract elevates the overall taste, providing a warm and aromatic quality that complements the nutty peanut butter. Using pure vanilla extract is recommended for the best flavor, as it offers a more authentic taste compared to synthetic alternatives.
Rolled Oats
The inclusion of rolled oats not only adds texture but also significantly boosts the nutritional value of the bars. Oats are an excellent source of dietary fiber, which aids in digestion and helps maintain a feeling of fullness. They also support heart health by contributing to lower cholesterol levels. Additionally, oats provide a range of vitamins and minerals, including iron, magnesium, and B vitamins, making them an integral part of any balanced diet.
Crispy Rice Cereal
To achieve that satisfying crunch, crispy rice cereal is a key ingredient in these bliss bars. This light and airy cereal contributes a delightful texture that contrasts beautifully with the creaminess of the peanut butter. For those following a gluten-free diet, many brands offer gluten-free crispy rice cereal, making it easy to adapt this recipe to fit various dietary needs.
Optional Ingredients
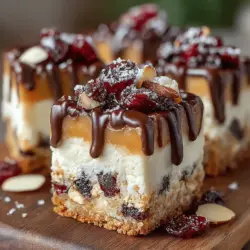
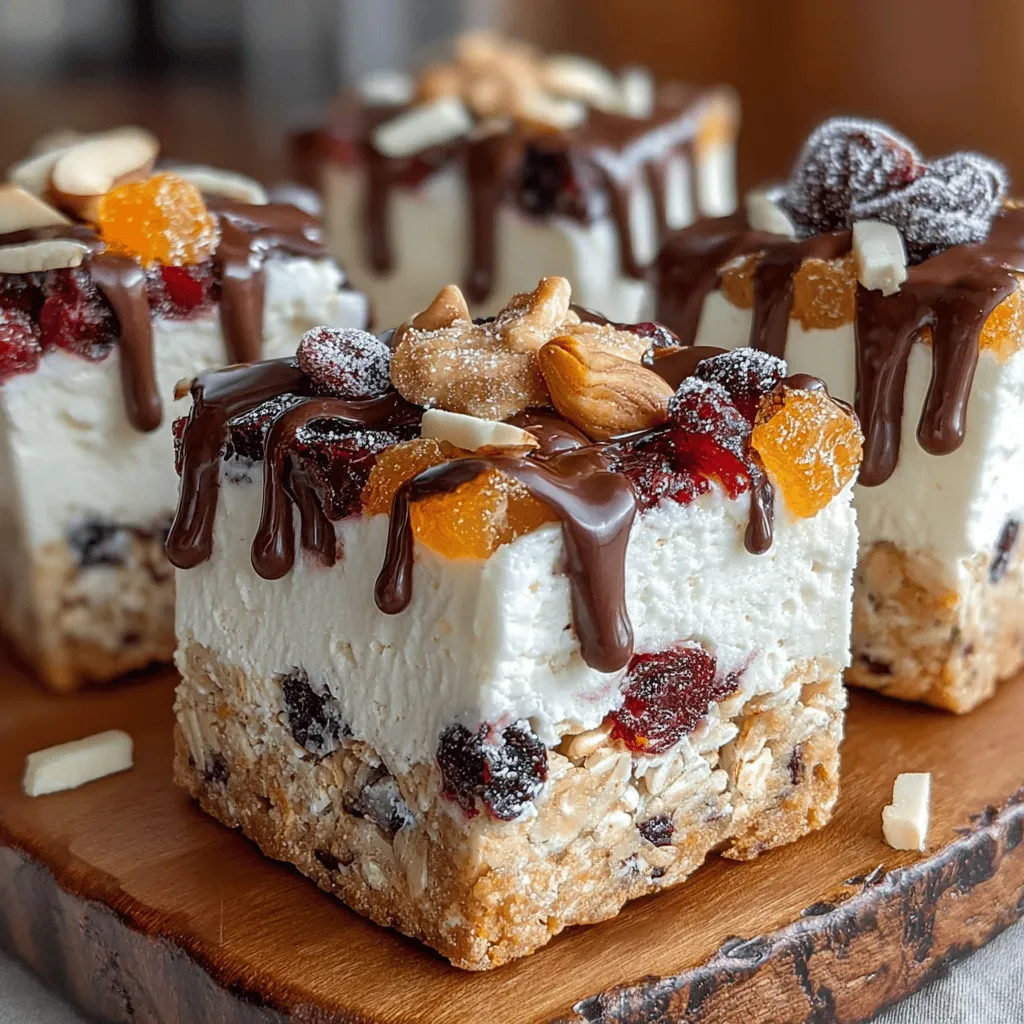
To personalize your Peanut Butter Crunch Bliss Bars, consider adding optional ingredients that can enhance both flavor and nutrition. Dried cranberries or chocolate chips can introduce a burst of sweetness and a chewy texture, while chopped nuts—such as almonds or walnuts—add healthy fats and additional protein. Each of these options allows you to create a unique twist on the classic recipe, catering to individual preferences.
Dark Chocolate
A drizzle of dark chocolate not only makes the bars visually appealing but also adds a layer of indulgence. Dark chocolate is rich in antioxidants, particularly flavonoids, which are known for their heart health benefits. When choosing dark chocolate, opt for varieties that contain at least 70% cocoa to maximize health benefits while keeping added sugars to a minimum.
Step-by-Step Instructions for Peanut Butter Crunch Bliss Bars
Now that we’ve explored the wonderful ingredients that contribute to Peanut Butter Crunch Bliss Bars, it’s time to dive into the method. The best part about this recipe is its simplicity; it’s a no-bake treat that requires minimal effort and equipment, making it perfect for both novice and experienced cooks.
Mixing Wet Ingredients
Start by preparing the wet ingredients, which will serve as the base for the bars. In a mixing bowl, combine the creamy peanut butter, honey (or maple syrup), and vanilla extract. It’s important to mix these ingredients thoroughly until you achieve a smooth and cohesive consistency. This step is crucial as it ensures that the flavors meld together seamlessly, creating a deliciously rich mixture.
Adding Dry Ingredients
Once the wet ingredients are well combined, it’s time to incorporate the dry ingredients. Gradually add the rolled oats and crispy rice cereal to the peanut butter mixture. This should be done carefully to ensure an even distribution of flavors and textures. Use a spatula or wooden spoon to gently fold the dry ingredients into the wet mixture, being careful not to overmix. The goal is to achieve a uniform blend where every bite contains the delightful crunch of rice cereal and the wholesome goodness of oats.
Preparing the Pan
To prevent sticking and make the bars easy to remove once set, proper pan preparation is essential. Line an 8×8-inch square baking pan with parchment paper, allowing some overhang on the sides. This will make it easy to lift the bars out after they have set. Lightly grease the parchment paper with cooking spray or a small amount of coconut oil to ensure a smooth release. Once the pan is ready, transfer the peanut butter mixture into it, pressing it down firmly and evenly to create a compact layer.
With these initial steps complete, you’re well on your way to creating your very own Peanut Butter Crunch Bliss Bars. The combination of healthful ingredients and the straightforward method makes this recipe not only enjoyable to prepare but also a rewarding treat to savor. Stay tuned for the next part, where we will cover the final steps in crafting these delicious bars and tips for storing and serving them!
Pressing Mixture into the Pan
After preparing your bliss bar mixture, it’s time to transfer it into your chosen baking pan. This step is crucial. Pressing the mixture firmly into the pan ensures that the bars hold together well when cut, preventing crumbles and breaks. To do this effectively, use a spatula or the back of a measuring cup to spread the mixture evenly. Start from the center and work your way to the edges, applying even pressure. For an extra compact finish, cover the mixture with parchment paper and press down firmly. This not only helps with compactness but also makes it easier to lift the bars out of the pan once set.
Melting Chocolate
The chocolate drizzle is one of the highlights of these Peanut Butter Crunch Bliss Bars. To achieve a smooth, luscious drizzle, it’s essential to melt the chocolate properly. Begin by chopping your chocolate into small, even pieces to promote uniform melting. You can melt chocolate using either a microwave or a double boiler.
Best Practices for Melting Chocolate:
– Microwave Method: Place chopped chocolate in a microwave-safe bowl and heat it in 30-second intervals, stirring in between, until fully melted and smooth.
– Double Boiler Method: Fill a pot with a couple of inches of water and bring it to a simmer. Place a heat-proof bowl on top (ensuring it does not touch the water) and add the chocolate. Stir continuously until melted.
Whichever method you choose, be cautious not to overheat the chocolate, as it can scorch and lose its silky texture.
Drizzling Chocolate
Once your chocolate is melted, it’s time to drizzle it artistically over the pressed mixture. Transfer the melted chocolate into a piping bag or a zip-top bag with a small corner snipped off for more control. This technique allows you to create beautiful patterns, whether it’s a simple zigzag or a more elaborate design.
Creative Ideas for Presentation:
– Layered Drizzle: Use two types of chocolate, such as dark and white chocolate, for a striking contrast.
– Nut Toppings: Sprinkle crushed nuts or sea salt over the chocolate drizzle before it sets for added texture and flavor.
– Cocoa Powder Dust: Lightly dust the finished bars with cocoa powder or powdered sugar for an elegant finish.
Chilling Process
After drizzling the chocolate, it’s crucial to chill the bars to set everything. Place the pan in the refrigerator for at least 1 hour or until the chocolate is firm. Chilling not only helps the chocolate to harden but also allows the bars to firm up, making them easier to cut and enhancing their texture. The cooling process helps meld the flavors together, resulting in a more cohesive taste experience.
Cutting and Serving
Once the bars are chilled and the chocolate has set, it’s time to cut them into squares or rectangles. Use a sharp knife for clean cuts, and if necessary, run the knife under warm water and wipe it dry for cleaner edges.
Suggestions for Presentation and Storage:
– Presentation: Serve the bars on a decorative platter, perhaps with fresh fruit or a dollop of yogurt on the side for a colorful contrast.
– Storage: Store the bars in an airtight container in the refrigerator for up to two weeks, or freeze them for longer storage. When freezing, separate layers with parchment paper to prevent sticking.
Nutritional Benefits of Peanut Butter Crunch Bliss Bars
These bars are not just delicious; they are also packed with nutritional benefits, making them a smart choice for a snack or dessert.
Breakdown of Nutrients:
– Calories: Approximately 150 calories per bar (based on a standard recipe serving).
– Protein: High in protein thanks to peanut butter, providing about 5-6 grams per serving.
– Fats: Contains healthy fats, primarily from peanut butter, contributing to satiety.
– Carbohydrates: Moderate carbohydrates, making them suitable for an energy boost without excessive sugar.
Health Benefits of a No-Bake Snack Option
These bliss bars are perfect for those looking for a quick, healthy option. Being no-bake, they retain more of their nutrients compared to baked snacks. They are also rich in fiber, healthy fats, and protein, making them a balanced choice for energy.
Comparison to Store-Bought Snacks
When compared to store-bought snacks, these bars stand out in terms of both cost-effectiveness and nutrition. Most packaged snacks are laden with preservatives, refined sugars, and unhealthy fats. In contrast, making your own bars allows you to control the ingredients, ensuring a healthier alternative that is both satisfying and wholesome.
Variations and Customizations
One of the best parts about making Peanut Butter Crunch Bliss Bars is the ability to customize them to suit your taste preferences or dietary needs.
Ingredient Substitutions:
– Nut Butter Varieties: Substitute peanut butter with almond butter, cashew butter, or sunbutter for a different flavor profile.
– Alternative Sweeteners: Use honey, maple syrup, or agave nectar instead of brown rice syrup for varying sweetness levels.
Flavor Variations:
– Spices: Add a dash of cinnamon, nutmeg, or vanilla extract to elevate the flavor.
– Add-ins: Consider mixing in chocolate chips, dried fruit, or seeds for added texture and taste.
Options for Dietary Restrictions:
– Gluten-Free: Use certified gluten-free oats.
– Vegan: Ensure that all ingredients, including chocolate, are vegan-friendly.
– Nut-Free: Replace nut butter with seed butter, ensuring all other ingredients are nut-free.
Perfect Occasions for Serving Peanut Butter Crunch Bliss Bars
These bliss bars are versatile and can be enjoyed on numerous occasions:
Ideas for Enjoyment:
– Snacks for Kids: They make for a healthy after-school snack that kids will love.
– Post-Workout Recovery: With their protein and healthy fats, these bars are perfect for refueling after exercise.
– Healthy Desserts: Serve them as a guilt-free dessert option at gatherings or family dinners.
Pairing Suggestions:
– Beverages: Pair with smoothies, milk alternatives, or herbal teas to create a balanced snack experience.
Conclusion
In summary, Peanut Butter Crunch Bliss Bars are not only easy to make but also a delightful treat that brings together health and indulgence. Their no-bake nature makes preparation a breeze, and with the ability to customize and experiment, you can create a version that suits your personal taste or dietary needs.
Creating these bars at home gives you the joy of crafting a healthy snack that can replace less nutritious store-bought options. So, roll up your sleeves, gather your ingredients, and embark on this delicious journey. Experiment with flavors, enjoy the process, and savor the satisfaction of indulging in a homemade treat that is both good for you and irresistibly delicious.