Introduction to Garlic Bliss Crunch Sticks
In the delightful realm of homemade bread, few recipes evoke the same sense of comfort and satisfaction as Garlic Bliss Crunch Sticks. This irresistible combination of garlic, aromatic herbs, and a golden, cheesy topping creates a culinary experience that transcends mere snacks or side dishes. These breadsticks are not just an accompaniment to your meals; they are a flavorful adventure that can elevate any dining experience to new heights.
Imagine biting into a warm, crusty breadstick that gives way to a soft and flavorful interior, infused with the robust essence of garlic and sprinkled with a hint of cheese. The smell wafting through your kitchen as they bake is enough to draw anyone in, creating an atmosphere of warmth and hospitality. Whether served alongside a hearty pasta dish, a fresh salad, or enjoyed on their own as a snack, Garlic Bliss Crunch Sticks are sure to become a favorite in your kitchen repertoire.
The versatility of these breadsticks is another aspect that makes them so delightful. You can customize the flavor profile by adjusting the herbs or adding spices to suit your palate. They can be served as an appetizer at gatherings, a side for a family meal, or even as a late-night treat. With their irresistible flavor and inviting aroma, Garlic Bliss Crunch Sticks are bound to impress your family, friends, and any guests fortunate enough to try them.
Ingredients Breakdown for Garlic Bliss Crunch Sticks
To create the perfect Garlic Bliss Crunch Sticks, understanding the purpose and quality of each ingredient is essential. Here’s a closer look at what goes into this mouthwatering recipe:
– All-Purpose Flour: As the backbone of the breadsticks, all-purpose flour provides the structure necessary for a chewy yet tender texture. Its gluten content helps the breadsticks hold their shape and rise beautifully during baking.
– Yeast: This leavening agent is crucial for creating the airy, light texture of the breadsticks. When activated, yeast ferments and produces carbon dioxide, which causes the dough to rise. The choice of yeast—whether active dry or instant—can impact the final product, but both types will yield delicious results.
– Sugar: A small amount of sugar not only enhances the flavor of the breadsticks but also plays a vital role in activating the yeast. It provides a food source for the yeast, helping it to multiply and produce gas, which contributes to the dough’s rise.
– Salt: Often underestimated, salt is an essential ingredient that enhances the overall flavor of the breadsticks. It also regulates yeast activity, ensuring a balanced rise and preventing the dough from becoming overly sticky.
– Warm Water: The temperature of the water used to activate the yeast is critical. Warm water (typically around 110°F or 43°C) helps to awaken the yeast and create the ideal environment for fermentation. It is also necessary for hydrating the flour and forming the dough.
– Olive Oil: Adding olive oil to the dough introduces moisture and richness, resulting in a tender texture. It also contributes a subtle flavor that complements the garlic and herbs, enhancing the overall taste of the breadsticks.
– Garlic: The star ingredient, garlic, is what truly sets these breadsticks apart. Whether using fresh minced garlic or garlic powder, this ingredient infuses the dough with its robust flavor, creating an aromatic profile that is simply irresistible.
– Dried Herbs: Oregano and basil are the classic herbs used in this recipe, adding an aromatic depth that pairs beautifully with the garlic. These herbs not only enhance the flavor but also add a touch of color to the breadsticks.
– Crushed Red Pepper Flakes: While optional, crushed red pepper flakes can be added for a hint of heat. This customizable element allows you to adjust the spice level according to your preference, making it easy to cater to different tastes.
– Parmesan Cheese: A generous sprinkle of grated Parmesan cheese on top of the breadsticks adds a savory, cheesy richness that beautifully complements the garlic. As the breadsticks bake, the cheese melts and forms a delicious crust, elevating the overall flavor.
– Fresh Parsley: Finally, a sprinkle of fresh parsley not only adds a pop of color but also contributes a fresh, herbal note that balances the richness of the cheese and garlic.
Step-by-Step Instructions for Preparing Garlic Bliss Crunch Sticks
Now that you’re familiar with the ingredients, let’s dive into the step-by-step instructions for making your very own Garlic Bliss Crunch Sticks. The process is straightforward and rewarding, resulting in a batch of breadsticks that are sure to impress.
Preparing the Dough
1. Activate the Yeast: Begin by measuring out the warm water in a small bowl. Sprinkle the yeast and sugar over the water, stirring gently to combine. Allow this mixture to sit for about 5-10 minutes, or until it becomes frothy. This indicates that the yeast is active and ready to work its magic.
2. Combine the Dry Ingredients: In a large mixing bowl, whisk together the all-purpose flour and salt. This ensures that the salt is evenly distributed throughout the flour, which is important for even flavor and yeast activity.
3. Mix the Dough: Once the yeast mixture is frothy, pour it into the bowl with the flour mixture, followed by the olive oil and minced garlic. Stir with a wooden spoon or spatula until the ingredients are combined and a shaggy dough begins to form.
Kneading Techniques
4. Knead the Dough: Transfer the dough onto a lightly floured surface. Begin kneading the dough by pushing it away from you with the heel of your hand, then folding it back over itself. Rotate the dough a quarter turn and repeat this process for about 8-10 minutes. The goal is to develop gluten, resulting in a smooth and elastic dough. If the dough feels sticky, sprinkle a little more flour as needed, but be cautious not to add too much.
5. Check the Texture: The kneaded dough should be soft and pliable, bouncing back when gently pressed. This elasticity is key to achieving the perfect texture for your Garlic Bliss Crunch Sticks.
Understanding the First Rise
6. First Rise: Place the kneaded dough in a lightly greased bowl, turning it to coat all sides. Cover the bowl with a clean kitchen towel or plastic wrap. Set the bowl in a warm, draft-free area to rise for about 1 to 1.5 hours or until the dough has doubled in size. To create an optimal rising environment, you can preheat your oven to the lowest setting for a few minutes, then turn it off and place the dough inside.
7. Check for Readiness: After the rising time, gently poke the dough with your finger. If the indentation remains, your dough is ready for the next step. If it springs back, allow it to rise for a little longer.
Prepping the Baking Environment
8. Preheat the Oven: Once the dough has risen, preheat your oven to 425°F (220°C). This high temperature will help create a crispy exterior on the breadsticks while keeping the inside soft and fluffy.
9. Prepare the Baking Sheet: Line a baking sheet with parchment paper or lightly grease it with cooking spray to prevent sticking. This will ensure that your Garlic Bliss Crunch Sticks bake evenly and come out easily after cooking.
By following these steps, you’ll be well on your way to creating a batch of Garlic Bliss Crunch Sticks that are not only delicious but also a joy to make. The anticipation builds as you prepare the dough, and soon enough, you’ll be ready to shape and bake these delightful treats. Stay tuned for the next part, where we’ll dive into the shaping, baking, and finishing touches that make these breadsticks truly irresistible.
Creating the Garlic Topping
To elevate the flavor profile of your Garlic Bliss Crunch Sticks, the garlic topping is indispensable. Begin by finely mincing the garlic cloves, as this enhances their pungency and allows for an even distribution across the breadsticks. In a skillet, heat a combination of olive oil and unsalted butter over medium heat. This blend not only enriches the flavor but also helps in achieving a golden-brown color on the breadsticks.
Once the oil is shimmering, add the minced garlic and sauté it for about 1-2 minutes until fragrant, being careful not to let it brown too much, as burnt garlic can impart a bitter taste. Next, introduce fresh herbs, such as chopped parsley or oregano, into the pan. The herbs should be added towards the end of the sautéing process to preserve their vibrant flavor and color. Stir everything together and remove the skillet from the heat, allowing the mixture to cool slightly before applying it to your shaped dough. This topping is essential for infusing each bite with aromatic goodness.
Shaping the Breadsticks
Now that you have your garlic topping ready, it’s time to shape your dough into beautiful, uniform sticks. Start by rolling out the dough on a lightly floured surface to a rectangle approximately 1/2 inch thick. The thickness is crucial; if the sticks are too thick, they won’t cook evenly, and if they’re too thin, they may become overly crunchy.
Using a sharp knife or a pizza cutter, slice the dough into strips about 1 inch wide. For a more rustic feel, you can create uneven shapes, but for uniformity, aim for consistent sizes. Once cut, gently stretch each dough strip to form a stick shape, ensuring they are roughly the same length for even cooking. This shaping process is vital, as it directly influences the texture and overall appearance of your Garlic Bliss Crunch Sticks.
Coating and Cheese Application
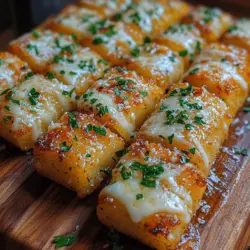
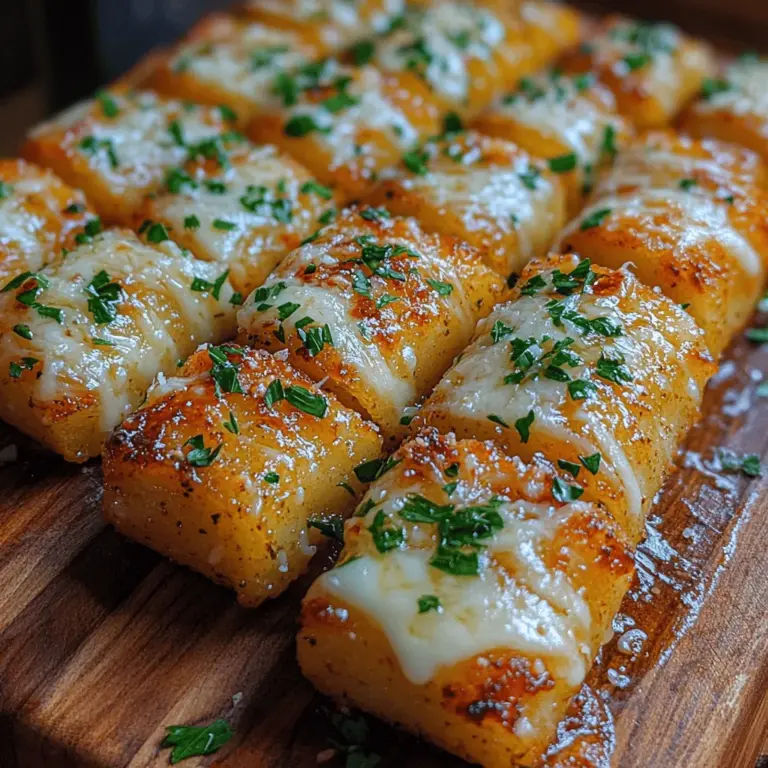
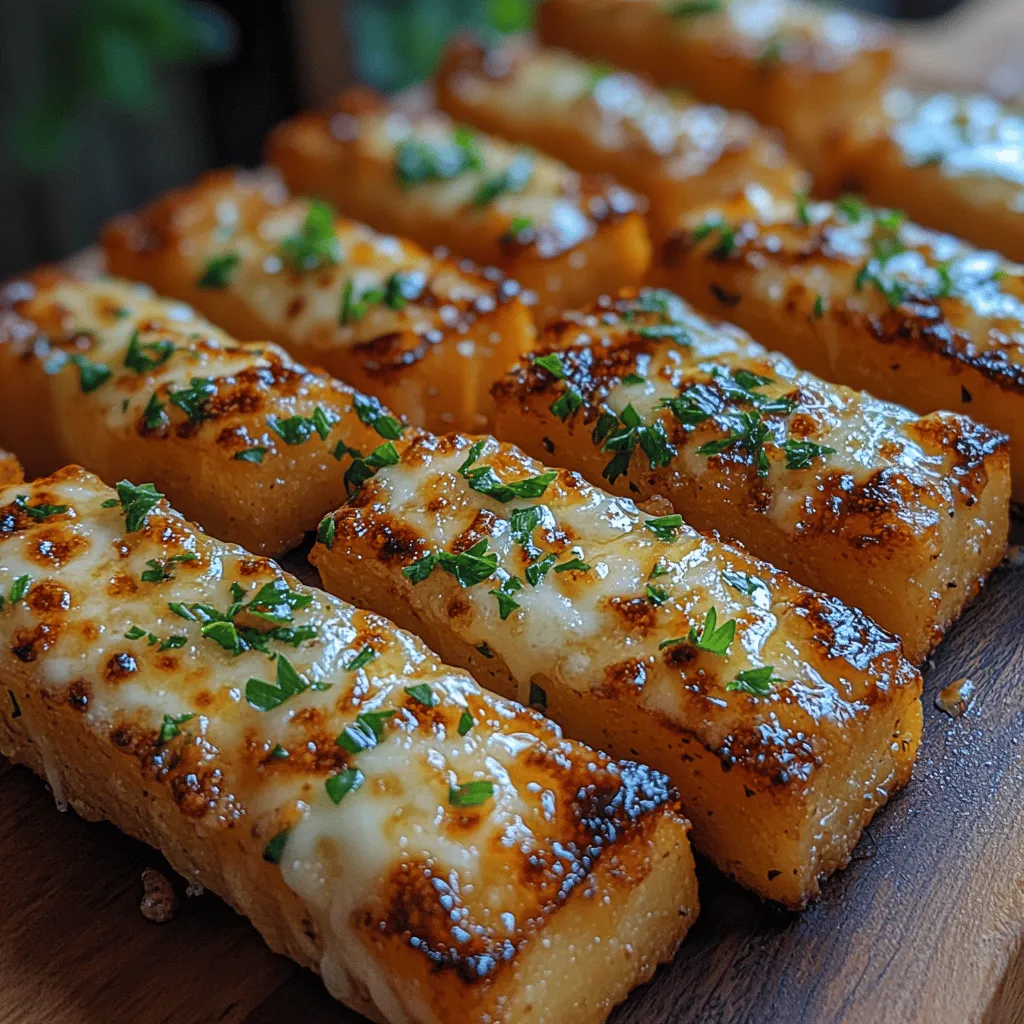
To ensure that your breadsticks are bursting with flavor, evenly coat each stick with the prepared garlic topping. Use a pastry brush or your hands to generously apply the mixture, making sure to cover both sides of the breadsticks. The garlic topping not only contributes to the taste but also creates a delightful crust during baking.
After coating the sticks, sprinkle a moderate amount of shredded cheese, such as mozzarella or Parmesan, over the top. Be mindful not to overdo it; you want the cheese to complement the garlic rather than overpower it. A light hand will allow the breadsticks to retain their crunch while providing that irresistible cheesy flavor.
Second Rise Considerations
The second rise is a crucial step in achieving the perfect texture for your breadsticks. After shaping and applying the toppings, place the sticks on a parchment-lined baking sheet, ensuring they have enough space to expand. Cover them loosely with a clean kitchen towel and let them rise for about 30 minutes. This step allows the yeast to work its magic, creating air pockets that contribute to a softer and fluffier interior.
Pay attention to the dough; it should puff up slightly, indicating that it’s ready for baking. Skipping this step can lead to denser breadsticks, which is not the desired outcome for the Garlic Bliss Crunch Sticks.
Baking Process
Preheat your oven to 375°F (190°C), ensuring it reaches the right temperature before placing your breadsticks inside. A hot oven is essential for a good rise and a crispy exterior. Bake the breadsticks for 15-20 minutes, or until they are golden brown and the cheese is bubbling.
To check for doneness, look for a deep golden color on the tops and a firm texture when lightly pressed. If you prefer a crunchier exterior, you can turn on the broiler for the last 1-2 minutes of baking, but keep a close eye to prevent burning. Once out of the oven, let them cool slightly on a wire rack to maintain their crunch.
Garnishing and Serving Suggestions
Garnishing your Garlic Bliss Crunch Sticks can take them from ordinary to extraordinary. Finely chop some fresh parsley and sprinkle it over the sticks immediately after they come out of the oven. This not only enhances the visual appeal but also adds a fresh flavor that complements the garlic.
These breadsticks are incredibly versatile and can be served in various ways. They make an excellent accompaniment to soups, salads, or pasta dishes, providing a delightful contrast to creamy or robust flavors. For a snack or appetizer, consider serving them with dipping sauces. Marinara, garlic butter, or a rich olive oil blend with balsamic vinegar are ideal options that elevate the experience.
If you’re hosting a gathering, these Garlic Bliss Crunch Sticks can be a highlight of your spread. Their delightful aroma and appetizing appearance will undoubtedly impress your guests, making them a perfect addition to any festive occasion.
Flavor Profile and Texture of Garlic Bliss Crunch Sticks
The sensory experience of enjoying Garlic Bliss Crunch Sticks is truly remarkable. With a crunchy exterior and a soft, chewy interior, the texture balance is key to their appeal. The outer layer, kissed by garlic and herbs, provides a satisfying crunch, while the inside remains pillowy soft, creating a delightful contrast in every bite.
As they bake, the aromatic qualities of garlic and herbs fill your kitchen, creating an inviting atmosphere. The savory notes from the cheese meld beautifully with the garlic, while the optional red pepper flakes can add a subtle kick, appealing to those who enjoy a bit of heat. This complexity of flavors ensures that each bite is a delightful experience.
Serving Suggestions and Pairing Ideas
When it comes to enjoying your Garlic Bliss Crunch Sticks, the possibilities are endless. These breadsticks are perfect as an accompaniment to a variety of meals. Pair them with a hearty soup, a crisp salad, or a flavorful pasta dish to create a well-rounded dining experience.
For a more casual setting, consider offering a selection of dipping sauces. A classic marinara is always a favorite, but garlic butter, infused with additional herbs, or a simple olive oil blend can elevate the breadsticks further. This makes them a versatile snack or appetizer that will please any crowd.
If you’re hosting a gathering or a family dinner, serve these breadsticks alongside your main courses. Their warm, inviting aroma and crunchy texture will enhance the overall dining experience, making your meal feel special. They can also be a great conversation starter, encouraging guests to share their thoughts and experiences around homemade bread.
Nutritional Information and Dietary Considerations
When considering the nutritional aspects of Garlic Bliss Crunch Sticks, it’s important to be mindful of portion sizes. On average, each stick contains approximately 150 calories, depending on the amount of cheese and toppings used. For those watching their dietary intake, these breadsticks can still fit into a balanced diet when enjoyed in moderation.
For those with dietary restrictions, the recipe can be modified to cater to specific needs. For a gluten-free version, substitute all-purpose flour with a gluten-free flour blend. Additionally, to make it vegan, replace the butter with plant-based alternatives and omit the cheese, or use a dairy-free cheese substitute. These adaptations allow everyone to enjoy the delicious flavors of Garlic Bliss Crunch Sticks without compromising their dietary choices.
Conclusion: The Joy of Homemade Garlic Bliss Crunch Sticks
Creating your own Garlic Bliss Crunch Sticks at home is not just about baking; it’s about the joy and satisfaction that comes from crafting something delicious with your own hands. The process—from preparing the garlic topping to shaping, baking, and finally savoring the finished product—offers a rewarding experience that fills your kitchen with warmth and inviting aromas.
These breadsticks bring comfort and flavor to any meal, making them a delightful addition to your culinary repertoire. As you experiment with the recipe, you may find yourself adjusting the flavors to suit your preferences, allowing for creativity and personalization. Embrace the art of baking and enjoy the process as much as the delicious outcome. Your family and friends will undoubtedly appreciate the effort, making every occasion special with the irresistible taste of Garlic Bliss Crunch Sticks.