
Introduction
The indulgent combination of chocolate and peanut butter has captivated dessert lovers for generations. Each bite brings a symphony of flavors that are both rich and satisfying. There’s something irresistibly comforting about the pairing of these two ingredients, which together create a culinary experience that feels both familiar and luxurious. Among the many ways to enjoy this classic duo, the decadent chocolate peanut butter lava cake stands out as a true showstopper.
Lava cakes, also known as molten chocolate cakes, have gained immense popularity for their delightful surprise: a warm, gooey center that flows out like molten lava when cut into. This dessert exudes elegance and sophistication, making it a perfect choice for special occasions or those indulgent evenings at home when you want to treat yourself or impress your guests. The addition of a creamy peanut butter filling elevates this dessert to an entirely new level, providing a luscious contrast to the rich chocolate exterior.
As you delve into the preparation of this decadent chocolate peanut butter lava cake, you’ll discover a world of flavors and textures that come together beautifully. With a warm, gooey center that oozes peanut butter goodness, each bite offers a harmonious blend of sweetness and nuttiness that makes it an unforgettable treat.
Understanding the Decadent Chocolate Peanut Butter Lava Cake
At its core, a lava cake is a dessert that masterfully combines the elements of a cake with a molten center. The outer layer is a soft, chocolatey cake, while the interior remains liquid, creating a dramatic and delicious presentation when served. The concept of a lava cake is simple yet genius, and its execution requires precision to achieve the perfect balance between a fully baked exterior and a molten interior.
What sets our chocolate peanut butter lava cake apart from traditional lava cakes is the unique twist of incorporating a peanut butter filling. This addition not only enhances the flavor profile but also introduces a creamy texture that complements the dense chocolate cake. The result is a dessert that offers a delightful sensory experience: the warm, gooey center contrasts beautifully with the cake’s fluffy exterior, while the rich aroma of chocolate mingles with the nutty scent of peanut butter, creating an enticing invitation for your taste buds.
When you take a forkful of this decadent treat, you’ll experience the velvety chocolate cake giving way to the warm, flowing peanut butter center, creating a delightful combination of flavors that dance on your palate. The rich, buttery notes of the cake pair seamlessly with the creamy, nutty filling, making each bite a moment of bliss. This dessert is not just a feast for the taste buds; it’s also a visual delight, with the molten center creating an impressive presentation that will surely wow your guests.
Ingredients Breakdown
To create the perfect decadent chocolate peanut butter lava cake, you’ll need a selection of high-quality ingredients that will contribute to the overall flavor and texture of the dessert. Each ingredient plays a crucial role in achieving the desired outcome, so it’s essential to understand their functions.
Ingredients for the Lava Cake
– Butter: This ingredient adds moisture and richness to the cake, ensuring it remains tender and flavorful. Using unsalted butter allows you to control the saltiness of the final product.
– Semi-Sweet Chocolate: The deep chocolate flavor is paramount in this recipe. Semi-sweet chocolate strikes the perfect balance, delivering sweetness while still providing a rich, chocolatey essence.
– Eggs: Essential for structure, eggs are what help bind the ingredients together. They also contribute to the lava effect, creating that coveted molten center.
– All-Purpose Flour: This ingredient provides the necessary structure to the cake while keeping it light and airy.
– Powdered Sugar: Used to sweeten the cake and provide a smooth texture without any graininess. It dissolves easily, ensuring a silky batter.
– Vanilla Extract: A splash of vanilla adds depth and enhances the overall flavor profile of the cake.
Ingredients for the Peanut Butter Filling
– Creamy Peanut Butter: This is the star of the filling. It adds a rich, nutty flavor and creamy texture that contrasts beautifully with the chocolate cake.
– Powdered Sugar: Used to sweeten the filling, it ensures a smooth consistency that blends well with the peanut butter.
– Salt: A pinch of salt enhances the flavors of the peanut butter, balancing the sweetness and enriching the overall taste.
Using high-quality ingredients is crucial for achieving the best flavor in your decadent chocolate peanut butter lava cake. Opt for a good brand of semi-sweet chocolate and natural peanut butter for a rich and satisfying dessert that will impress everyone.
Preparation Steps
Now that you have gathered all the necessary ingredients, it’s time to dive into the preparation process. Follow these steps closely to ensure that your chocolate peanut butter lava cake turns out perfectly every time.
Preheating the Oven
Before you begin mixing your ingredients, preheating your oven is crucial. Set your oven to 425°F (220°C). The high temperature is vital for creating the perfect lava effect, allowing the outer cake to bake while leaving the center molten. Make sure to give your oven ample time to reach the desired temperature before placing your cakes inside, as this will ensure even cooking.
Preparing the Peanut Butter Filling
1. Mixing the Filling: In a medium bowl, combine 1 cup of creamy peanut butter, 1/2 cup of powdered sugar, and a pinch of salt. Using a hand mixer or a spatula, blend the ingredients until they are fully combined and smooth. The mixture should be thick yet spreadable.
2. Freezing the Filling: Once your peanut butter mixture is ready, scoop it into small silicone molds or ice cube trays, pressing down to ensure it holds its shape. Place these molds in the freezer for about 30 minutes or until solid. This step is essential as it ensures your peanut butter filling retains its shape during baking, creating that desirable molten center.
Melting Chocolate and Butter
1. Chop the Chocolate: Take 8 ounces of semi-sweet chocolate and chop it into small pieces. This helps it melt evenly and quickly.
2. Combine with Butter: In a heatproof bowl, combine the chopped chocolate with 1/2 cup of unsalted butter. You can melt this mixture using a double boiler method or in the microwave. If using the microwave, heat the mixture in 30-second intervals, stirring in between, until fully melted and smooth. Be careful not to overheat the chocolate, as this can cause it to seize.
3. Cool Slightly: Once melted, allow the chocolate and butter mixture to cool slightly before proceeding to the next steps. This will prevent the eggs from cooking when added.
By following these initial preparation steps carefully, you set the foundation for a successful and indulgent decadent chocolate peanut butter lava cake. The combination of the rich chocolate batter and the creamy peanut butter filling will undoubtedly create a dessert that will leave a lasting impression. Stay tuned for the next part, where we will explore the final steps to assemble and bake this divine dessert.
Techniques for Melting Chocolate Without Burning
Melting chocolate is a crucial step in preparing your Decadent Chocolate Peanut Butter Lava Cake, and doing it correctly ensures a smooth, rich base for your batter. To melt chocolate without burning, you have a couple of reliable methods at your disposal:
1. Double Boiler Method: Place a heatproof bowl over a saucepan filled with a few inches of simmering water. Ensure the bowl doesn’t touch the water. Stir the chocolate frequently until it’s fully melted and smooth. This gentle heat prevents direct contact and reduces the risk of scorching.
2. Microwave Method: If you’re short on time, melting chocolate in the microwave is effective. Place chopped chocolate in a microwave-safe bowl, heating it in 20-second intervals. Stir between each interval until the chocolate is just melted. Be cautious; chocolate can quickly go from melted to burnt in the microwave if left unattended.
Importance of Letting the Mixture Cool
Once your chocolate is melted, it’s essential to allow it to cool slightly before adding other ingredients, particularly eggs. This step is crucial because hot chocolate could inadvertently cook the eggs, leading to an undesirable texture in your cake batter. Aim for your melted chocolate to cool to a warm, but not hot, temperature—just enough to be comfortable to the touch.
Mixing Ingredients
Now that your chocolate is melted and cooled, it’s time to mix your ingredients properly. Here’s how to achieve the perfect batter:
Incorporating Sugars and Eggs
Start by adding granulated sugar and brown sugar to the melted chocolate. Whisk them together until well combined. The sugars should dissolve into the warm chocolate, creating a smooth mixture. Then, add the eggs, one at a time, whisking thoroughly after each addition. This method not only incorporates the sugars but also helps achieve a velvety batter.
Folding in Dry Ingredients
Next, it’s time to integrate your dry ingredients, which typically include flour and cocoa powder. Use a spatula to gently fold the flour mixture into the chocolate batter. This technique is crucial as it maintains airiness in the batter. Over-mixing can lead to a dense cake, which defeats the purpose of a light, lava-filled dessert. Fold until just combined—small streaks of flour are okay.
Filling the Ramekins
With your batter ready, it’s time to fill the ramekins and prepare for the peanut butter surprise at the center.
Layering the Batter and Freezing Peanut Butter Balls
Start by spooning a small amount of the batter into the bottom of each greased ramekin—just enough to cover the base. Next, take the frozen peanut butter balls and place one in the center of each ramekin. Then, cover the peanut butter balls with additional batter, filling the ramekins about three-quarters full. This layering ensures that the peanut butter stays nestled within the chocolate cake, creating a delicious lava effect when baked.
Tips for Achieving the Perfect Lava-to-Cake Ratio
To achieve that perfect lava-to-cake ratio, avoid overfilling your ramekins. If filled too high, the cakes may dome excessively and potentially overflow during baking. Additionally, ensure that the peanut butter balls are adequately frozen; this will help them retain their shape during the baking process.
Baking the Cakes
Now it’s time to bake your cakes to perfection.
Ideal Baking Time and Visual Cues for Doneness
Preheat your oven to 425°F (220°C) and place your filled ramekins on a baking sheet for easier handling. Bake the cakes for about 12-14 minutes. You’ll know they are done when the edges look set, but the center still appears slightly soft and jiggly. This visual cue indicates that the lava center is still gooey while the outer cake is baked through.
Explanation of the Baking Process
The key to the lava effect lies in the baking time. The high temperature ensures the outside of the cake cooks quickly, forming a crust that holds in the molten center. If you overbake them, the lava effect will disappear, resulting in a standard chocolate cake rather than the indulgent treat you desire.
Cooling and Serving
Once baked, it’s crucial to let the cakes sit for a few minutes before serving.
Importance of Letting the Cakes Sit
Allowing the cakes to cool slightly (about 5-10 minutes) helps them to firm up just enough to release from the ramekins without falling apart. This resting period also allows the lava center to stabilize, making for a more dramatic presentation when you invert the cakes.
Techniques for Inverting the Cakes
To serve, carefully run a knife around the edges of each ramekin to loosen the cake. Place a dessert plate over the top of the ramekin and swiftly invert them. Gently lift the ramekin off, and if done right, the cake should beautifully hold its shape, revealing the gooey center.
Suggestions for Garnishing
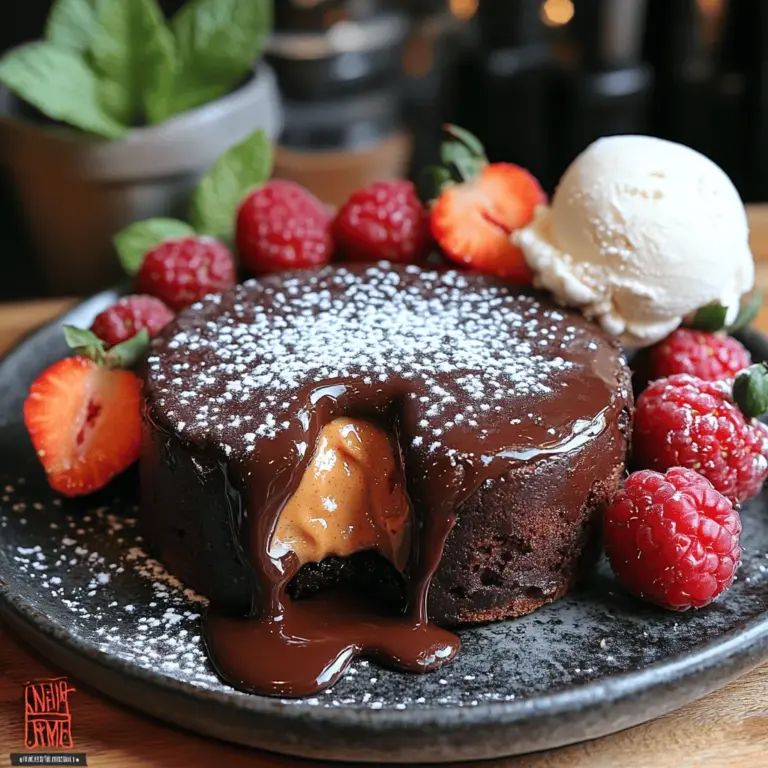
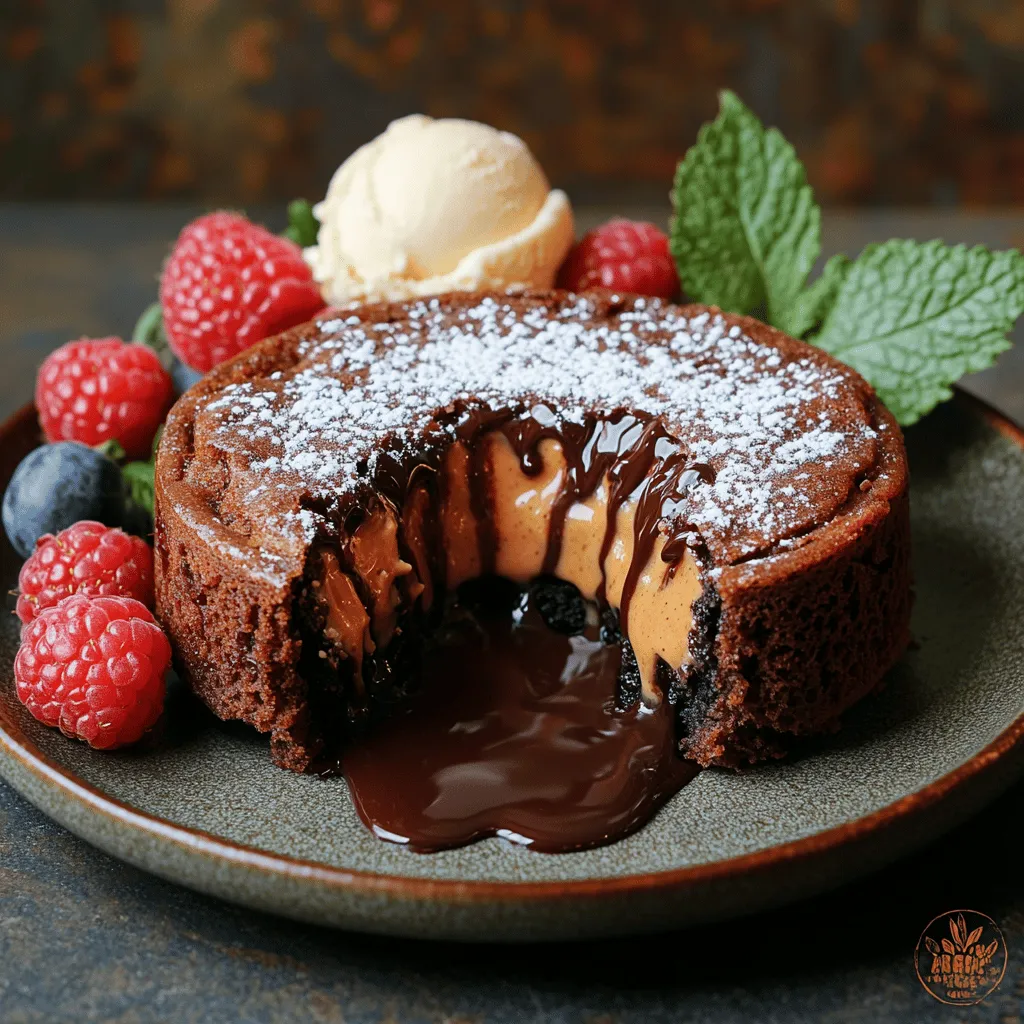
Enhance the presentation of your Decadent Chocolate Peanut Butter Lava Cake by garnishing with a dusting of powdered sugar or a drizzle of chocolate sauce. Fresh berries or whipped cream can also add a delightful contrast and freshness to the richness of the cake.
Serving Suggestions
This dessert is versatile and perfect for various occasions. Here are some serving suggestions to elevate your dessert experience further:
1. Pairing Options: Serve your lava cake with a scoop of vanilla ice cream or a dollop of whipped cream to balance the richness. Fresh berries such as raspberries or strawberries provide a tart contrast that complements the sweetness of the cake.
2. Presentation Ideas: For a sophisticated touch, place your lava cake on a dessert plate drizzled with chocolate sauce and sprinkle with crushed nuts or edible flowers for an elegant appearance.
3. Versatility of Serving: This dessert is ideal for special occasions like anniversaries, birthdays, or dinner parties. However, it can also be a delightful treat enjoyed on a cozy night in or as a sweet surprise after a weekday meal.
Nutritional Information
While the Decadent Chocolate Peanut Butter Lava Cake is undeniably an indulgent treat, understanding its nutritional profile can help you enjoy it mindfully.
– Overview of Nutritional Profile: Each serving contains a balance of fats, carbohydrates, and proteins from the chocolate, peanut butter, and eggs. The cake is rich in calories, so it’s best enjoyed in moderation.
– Consideration of Serving Size: Serving one cake per person is ideal, but you can easily share them for a lighter indulgence.
Conclusion
The Decadent Chocolate Peanut Butter Lava Cake embodies the perfect fusion of rich chocolate and creamy peanut butter—a dessert that is not only a feast for the eyes but also a delight for the tastebuds. Its simplicity in preparation combined with the show-stopping lava effect makes it an excellent choice for both casual and special occasions.
By following this recipe, you can create a dessert that will impress your family and friends, leaving them craving more. Don’t hesitate—try making this delightful treat at home and experience its luxurious taste and texture for yourself. Your culinary adventure awaits!
