Creamy Choco-Peanut Butter Oat Cups Recipe
Introduction
If you’re on the lookout for a delicious yet nutritious treat, look no further than Creamy Choco-Peanut Butter Oat Cups. These delightful little cups perfectly blend the indulgent flavors of chocolate and peanut butter with the wholesome goodness of oats, creating a snack that’s as satisfying as it is nourishing. Whether you’re preparing for a post-workout refuel, a midday pick-me-up, or a sweet end to your day, these oat cups offer a guilt-free way to satisfy your cravings.
What makes this recipe truly appealing is its simplicity and versatility. Not only are these cups easy to make, but they also cater to various dietary preferences, allowing you to enjoy them without compromising on taste or health. Packed with protein, fiber, and healthy fats, these oat cups strike a harmonious balance between indulgence and nutrition. They’re perfect for meal prep, allowing you to have a batch ready to go when those cravings hit.
Understanding the Ingredients
To appreciate the Creamy Choco-Peanut Butter Oat Cups fully, it’s essential to understand the key ingredients that contribute to their flavor and nutritional profile. Let’s break down the components that make these cups a wholesome treat.
Creamy Peanut Butter
Peanut butter is the star of this recipe, providing a rich, creamy texture and a dose of healthy fats. It’s important to choose the right type of peanut butter. Natural peanut butter, made from just peanuts and a pinch of salt, is the best option as it contains no added sugars or hydrogenated oils. Besides being delicious, peanut butter is a great source of protein, vitamins E and B3, and magnesium. It also contains antioxidants that can contribute to heart health and reduce inflammation.
Greek Yogurt
Another essential ingredient in these oat cups is Greek yogurt. Known for its thick, creamy consistency, Greek yogurt is a powerhouse of nutrition. It’s significantly higher in protein than regular yogurt, making it an ideal choice for muscle repair and satiety. Additionally, Greek yogurt is rich in probiotics, which support gut health and can improve digestion. By incorporating Greek yogurt into the recipe, you not only enhance the creaminess but also boost the overall nutritional value of the treat.
Sweeteners
When it comes to sweetening these oat cups, both honey and maple syrup are excellent choices. Honey offers a unique floral flavor and has natural antibacterial properties, while maple syrup provides a rich, caramel-like taste. Both options are natural sweeteners that can be used in moderation to add sweetness without the refined sugars found in many processed foods. Additionally, both sweeteners contain antioxidants and minerals—honey with its antibacterial qualities and maple syrup with its substantial amounts of zinc and manganese.
Rolled Oats
Oats are the backbone of this recipe, providing structure and a chewy texture that complements the creaminess of the peanut butter and yogurt. They are an excellent source of dietary fiber, which can help regulate digestion and promote satiety. Oats are also rich in vitamins, minerals, and antioxidants, making them a fantastic addition to any snack. Choosing rolled oats ensures that you get the whole grain benefits in a form that is easy to work with in recipes.
Vanilla Extract
Vanilla extract plays a crucial role in enhancing the overall flavor of the oat cups. Its sweet, aromatic profile elevates the natural flavors of the other ingredients, creating a more rounded taste experience. When selecting vanilla extract, opt for pure vanilla extract rather than artificial flavoring to ensure you’re getting the best flavor and quality.
Sea Salt
A touch of sea salt is essential in balancing the sweetness and enhancing the flavors of the other ingredients. Salt can bring out the richness of peanut butter and chocolate, making each bite more satisfying. It’s important to use it sparingly; just a pinch can elevate the overall taste without overwhelming the sweetness.
Dark Chocolate Chips
For those who love chocolate, dark chocolate chips are a delightful addition to these oat cups. Dark chocolate is packed with antioxidants and has been linked to various health benefits, including improved heart health and cognitive function. Choosing dairy-free dark chocolate chips can also make this recipe suitable for vegan diets, ensuring everyone can enjoy this treat without compromise.
Coconut Oil
Coconut oil is another key ingredient, primarily used for melting the chocolate to coat the oat cups. It adds a subtle tropical flavor and a smooth texture. Additionally, coconut oil contains medium-chain triglycerides (MCTs), which may provide quick energy and have been associated with various health benefits, including improved metabolism.
Step-by-Step Instructions
Now that we’ve explored the ingredients that make these Creamy Choco-Peanut Butter Oat Cups both delicious and nutritious, it’s time to dive into the step-by-step instructions for making them. This process is straightforward and allows you to create a batch of these delectable treats with ease.
1. Preparing the Base
Begin by gathering all your ingredients in one place. This will make the preparation process smoother. In a large mixing bowl, combine the creamy peanut butter, Greek yogurt, honey or maple syrup, vanilla extract, and a pinch of sea salt. It’s essential to mix these ingredients thoroughly until you have a smooth and creamy base. The peanut butter should be well incorporated, ensuring that every bite of your oat cups is packed with flavor.
2. Incorporating Oats
Once your base is ready, it’s time to add the rolled oats. Gently fold the oats into the mixture, ensuring they are evenly distributed. This step is crucial for achieving the right texture; you want the oats to be well-coated in the creamy mixture without becoming overly mushy. The goal is to have a cohesive blend where the oats provide a satisfying chew alongside the creamy peanut butter and yogurt.
3. Lining the Molds
Before you fill your mixture into molds, it’s a good idea to line them for easier removal later on. You can use muffin tins or silicone molds for this purpose. If you’re using a metal muffin tin, consider lining each cup with parchment paper or using cooking spray to prevent sticking. This will ensure that your oat cups come out easily and maintain their shape.
4. Filling the Molds
Now comes the fun part—filling the molds! Using a spoon or a small ice cream scoop, portion the oat mixture into each mold. Aim for even portions to ensure that each cup bakes uniformly. Press the mixture down lightly to create a compact base. If you’re adding dark chocolate chips, sprinkle a few on top of each cup, pressing them gently into the mixture for added sweetness and texture.
This step is important not only for portion control but also for presentation. You want your Creamy Choco-Peanut Butter Oat Cups to look inviting and delicious, and even filling will help with that.
With these steps completed, you’re ready to move on to the next part of the recipe, where the oat cups will be baked to perfection, creating a delightful treat that combines health benefits with indulgent flavors. Stay tuned for the following sections, where we’ll explore baking techniques, storage tips, and serving suggestions!
Freezing Process: Importance of Freezing Time for Firmness
Once you’ve poured the mixture into your prepared muffin tin or silicone molds, the next step is crucial for achieving the perfect texture. Freezing your creamy choco-peanut butter oat cups is essential for them to set properly. Ideally, you should allow them to freeze for at least 1-2 hours. This time is necessary for the oat cups to firm up and hold their shape when removed from the molds.
During the freezing process, the ingredients meld together, creating a cohesive and smooth texture. If you rush this step, the cups may remain too soft, making them difficult to handle and serve. For best results, ensure your freezer is set to a consistent temperature, and avoid opening it frequently during the freezing period to maintain the cold environment.
Melting Chocolate: Techniques for Achieving the Perfect Consistency
The chocolate topping is the pièce de résistance of these oat cups, elevating them from a simple snack to a decadent treat. To melt chocolate effectively, you can use either a microwave or a double boiler method.
– Microwave Method: Place chopped chocolate or chocolate chips in a microwave-safe bowl. Heat in 30-second intervals, stirring in between until smooth. Be cautious not to overheat, as chocolate can burn easily.
– Double Boiler Method: Fill a saucepan with a couple of inches of water and bring it to a simmer. Place a heat-proof bowl on top of the saucepan, ensuring it doesn’t touch the water. Add your chocolate to the bowl and stir until melted and glossy. This method allows for precise temperature control, reducing the risk of burning.
Whichever method you choose, be sure to let the chocolate cool slightly before topping your oat cups. This prevents the chocolate from melting into the cups and ensures a beautiful, contrasting layer.
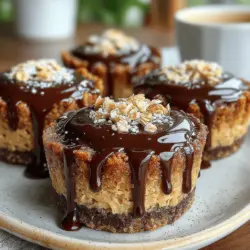
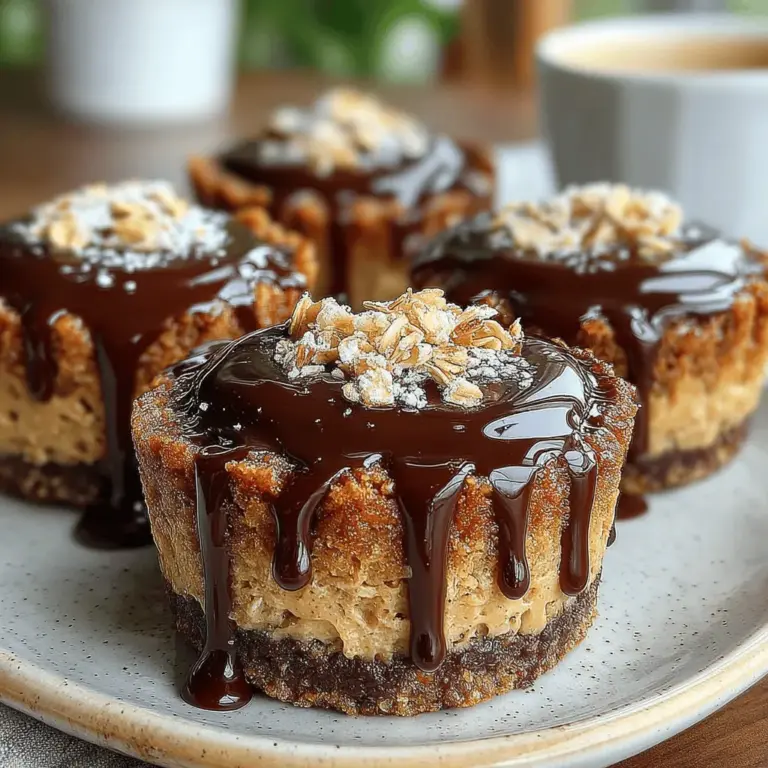
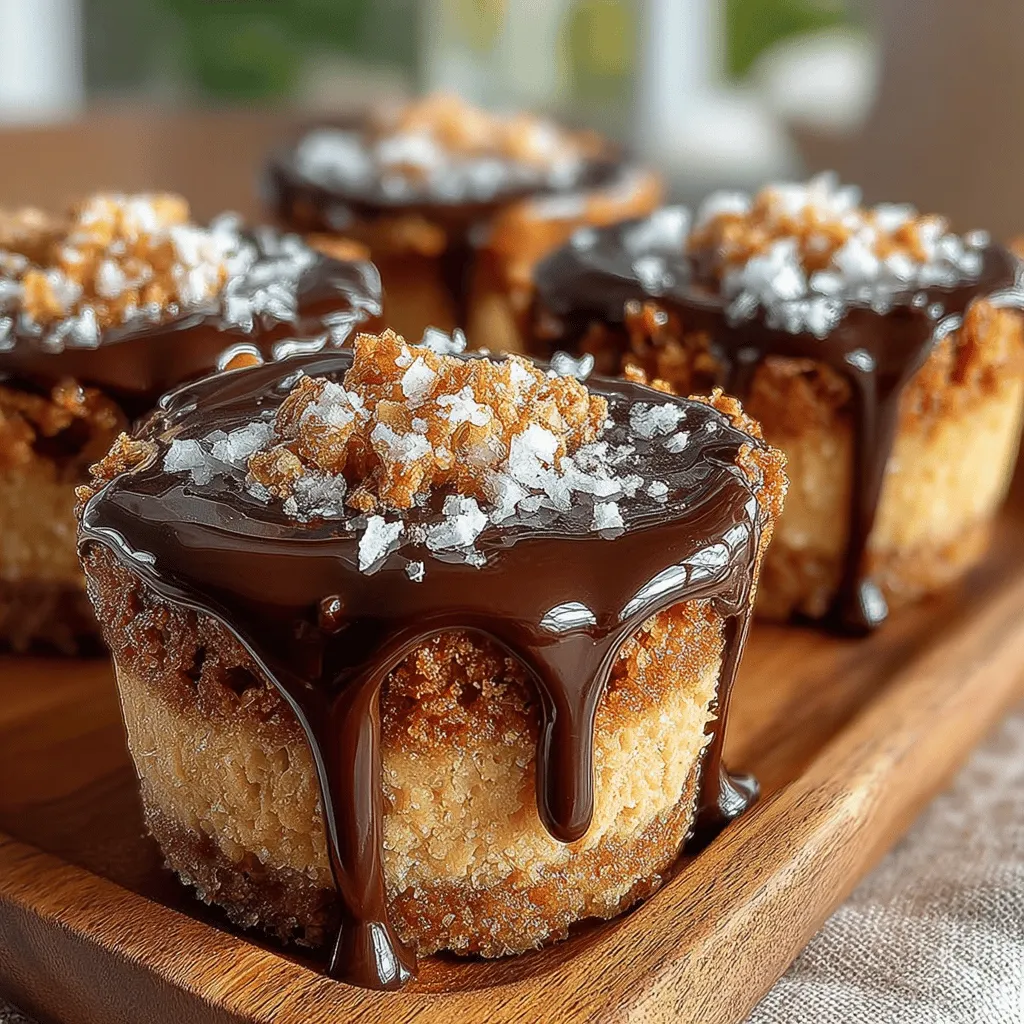
Topping with Chocolate: Creative Ideas for Presentation
When it comes to topping your oat cups with melted chocolate, there’s plenty of room for creativity. Here are some ideas to enhance the presentation of your treats:
– Drizzle Technique: Once the chocolate is melted, use a spoon or a piping bag to drizzle chocolate over the tops of the oat cups. This adds a decorative touch and makes them visually appealing.
– Sprinkles and Nuts: After drizzling the chocolate, consider adding toppings such as colorful sprinkles, crushed nuts, or even a sprinkle of sea salt. These add texture and flavor while also making the cups more enticing.
– Layered Presentation: For a more elaborate presentation, you can create layered cups. After freezing the oat base, add a layer of melted chocolate, followed by another layer of the oat mixture, and then top with more chocolate. This creates a delicious surprise when bitten into.
Refreezing: Importance of Allowing Chocolate to Set
After you’ve topped your oat cups with melted chocolate, it’s essential to allow them to refreeze. This final freezing period of about 30 minutes ensures that the chocolate hardens fully and adheres to the oat base. Skipping this step can lead to a messy experience when trying to serve the cups, as the chocolate may slide off or blend into the oat mixture.
Once properly set, the chocolate topping will create a delicious contrast to the creamy peanut butter base, making each bite a delightful experience.
Serving Suggestions: Ways to Enjoy the Cups for Different Occasions
These creamy choco-peanut butter oat cups are versatile and can be enjoyed in various ways:
– Snack Time: Perfect for a quick snack, these oat cups can be enjoyed on their own or alongside a piece of fruit for a balanced treat.
– Dessert Option: Serve them as a healthier dessert alternative at dinner parties or family gatherings. Pair with fresh berries or a scoop of yogurt for an impressive presentation.
– Lunchbox Treat: These oat cups make a great addition to lunchboxes for kids and adults alike. They are nutritious, portable, and provide an energy boost during the day.
– Post-Workout Snack: Packed with protein and healthy fats, they are ideal for refueling after a workout. Enjoy them alongside a protein shake or smoothie.
Nutritional Information
Understanding the nutritional content of your creamy choco-peanut butter oat cups is essential, especially if you’re mindful of your dietary choices. Each cup contains approximately:
– Calories: 180 kcal
– Protein: 5g
– Fats: 9g
– Carbohydrates: 20g
These macronutrients play essential roles in your diet. The protein helps with muscle repair and growth, while fats are crucial for hormone production and nutrient absorption. The carbohydrates provide the energy needed for daily activities and exercise.
When compared to store-bought snacks, these homemade oat cups are a healthier choice. Many commercial snacks are loaded with added sugars, unhealthy fats, and preservatives. By making your own, you control the ingredients, ensuring a more nutritious and wholesome option.
Variations and Customizations
One of the best aspects of this recipe is its flexibility. Here are some suggestions for variations and customizations:
– Ingredient Swaps: If you prefer almond butter or cashew butter, feel free to substitute the peanut butter. Each nut butter offers a unique flavor profile and nutritional benefits.
– Different Sweeteners: While the recipe typically calls for maple syrup or honey, you can experiment with agave nectar, stevia, or coconut sugar for different sweetness levels.
– Add-Ins: Get creative with add-ins such as chopped nuts, seeds (like chia or flaxseed), or dried fruits (like cranberries or raisins) to enhance the nutritional value and flavor.
– Vegan or Gluten-Free Options: To make this recipe vegan, ensure that you use a plant-based sweetener and vegan chocolate. For gluten-free options, ensure your oats are certified gluten-free.
Storage and Shelf Life
To keep your creamy choco-peanut butter oat cups fresh, proper storage is key. Here are some best practices:
– Storing: Place the oat cups in an airtight container. If stacking, separate layers with parchment paper to prevent sticking.
– Freezer Life: These oat cups can be stored in the freezer for up to three months. For best flavor and texture, consume them within this time frame.
– Thawing: When ready to enjoy, simply remove a cup from the freezer and let it thaw in the refrigerator for a few hours. For a quicker option, you can leave it out at room temperature for about 30 minutes before serving.
Conclusion
Creating creamy choco-peanut butter oat cups at home is not only a simple and rewarding experience but also a healthier alternative to store-bought snacks. With their rich flavor, satisfying texture, and balanced nutrition, these cups are sure to satisfy any sweet craving while keeping you fueled throughout the day.
Whether you’re enjoying them as a snack, dessert, or post-workout treat, these oat cups offer a delightful blend of taste and nutrition. We encourage you to try making this recipe at home and discover the joy of crafting nutritious treats that you and your family will love. With endless possibilities for customization, you can make these oat cups your own, ensuring they fit perfectly into your dietary preferences. So gather your ingredients, follow the steps, and indulge in a guilt-free treat that’s both delicious and nutritious!